In Part 1 of this series on pruning, we have seen the reasons why you want to set up a flat-topped canopy with a large number of small buds. In this part, Glen Johnson will further discuss how to go about creating plants that accomplish this goal.
Pruning The Clone
Believe it or not, I actually like to start this process with the clone. When I take a clone, I keep the top two or preferably three fully expanded leaves and don’t clip the ends of the leaves off. However, I do remove all except the top two or three lateral branches from the nodes. This is easily accomplished by simply pushing them to the side with your finger and they break off easily. Removal of those tiny lateral branches sets you up to have a baby plant that grows more up, than out. The goal is to eventually eliminate all branches within about 10” from the substrate. In the beginning, you want to promote upward growth.
 Glen Johnson
Canopy Height Decisions
Before we go any farther, it’s important to think long and hard on the basic concept of… how high should you let your canopy get above the planting medium. This is an often overlooked detail that many growers don’t even seem to recognize as an issue, but your decisions here determine a huge portion of the cost of production for each crop. For example, a newly planted flower room could potentially be flipped immediately, or it could be kept in veg longer and longer, which will certainly make bigger and bigger plants, but is that a good thing?
Assume your canopy is limited to 4’ wide rows, as most indoor gardens are. That 4’ width of the canopy could be one foot above the pot, or it could be six feet above the pot. Is the taller canopy more full? No! The top of the canopy is still only 4 feet wide whether you let your plants veg an extra month to create your own personal little Amazon Jungle, or if you start out with a bunch of small plants and flip them on day one. The goal is to fill out that canopy with tops and flip it! So, what difference does this make?
The difference is time, and time = money. Fewer days per crop = More crops per year = more money
The bigger your greenhouse is, the more valuable each day becomes, so if you can cut even just one week from your rotation cycle, you might be able to get ½ more crops per year.
Let’s break the math down to make this crystal clear. Let’s say you once made $100,000 in sales from your “best ever” run in your greenhouse. That space can potentially make $100K in 60 days = $1,666 (gross) per day. This is your benchmark. Now let’s say you decided to keep the whole space in veg for two weeks before you flip the lights so each crop cycle now takes 74 days. In this scenario, your greenhouse makes $1350 per day. The difference means you lose $316 per day for a total loss of $23,384 every time you do that. 74 days = 5 crops per year. $23,384 x 5 crops per year = You’re losing $116,920 - per year! That loss of $117,000 is only the beginning of the story. Here are even more ways that a high canopy costs you money.
- Bushier plants invite bugs and mold which increases labor for constant IPM sprays.
- Bushier plants make it FAR harder to spot bugs and mold which practically guarantees that any invasion will be worse because you are almost guaranteed to find it later.
- Detecting bug invasions later means they’ve had a chance to produce winged adults.
- Detecting fungal invasions later means they’ve had a chance to mature and produce spores.
- Bushy plants require added labor for pruning and defoliating in an attempt to minimize bug/mold issues.
- A canopy that is tall from top to bottom produces a less valuable “larfy” bud in the understory area.
- Heavy pruning in flower causes stress that slows growth and delays maturation.
- Larger, bushier plants require a larger quantity of very expensive IPM products for each spray.
With all that potential for lost money in mind, the goal obviously becomes one of trying to minimize the days each crop spends in the greenhouse. The goal is to achieve full canopy coverage over each table as soon as possible, then flip the lights. How fast can you rotate from one crop to the next? Is it possible to create a full canopy the first day the new plants arrive in the greenhouse? How can you make this happen?
If you use the concepts I’ve outlined in the rest of this article, you create a low canopy that starts only 6-10 inches above the medium, and after the stretch, you might get a canopy that is roughly 12” -20” thick from top to bottom. There is no getting around the fact that a 4 foot wide canopy is still only a 4 foot wide canopy even if it’s six feet above the table. The only difference is wasted time. Always focus your priority on reducing the number of days in the flower room. What matters is that one crop is cut down for harvest, and the next crop hits the ground running - preferably even that same day! Using the pruning and topping process that follows, your young plants can arrive in the flower room ready to go so you can flip the lights as soon as possible.
First Pruning - when the plant is about 10” tall
Usually two weeks after transplanting from clone trays to pots. At this stage you are going to pop off the very top bud, then take stock of your lateral branches and keep only the uppermost 4-6 branches. These will become the foundation branches for your adult plant. Choose your 4-6 branches from among the highest ones on the plant even if some of them are still extremely small at this point. They’ll get bigger.
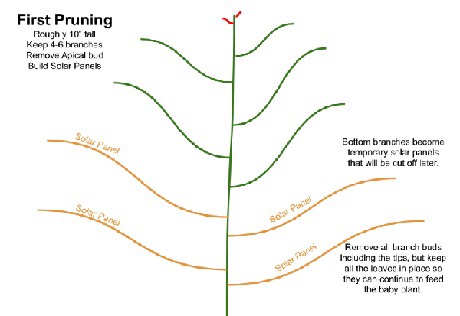
Removing the apical bud will stop the normal “Apical Dominance” and send growth hormones to the remaining branches. From this point on, you will no longer have the typical “Christmas Tree” growth pattern and you are on your way to creating a bush with a flat canopy that is filled with many branch tops that will eventually become buds.
Making lower branches into temporary Solar Panels
As mentioned before, the leaves are the solar panels that gather light to make the plant grow bigger. At this early stage in the pruning game, if you cut off a couple of the lower branches as I’ve suggested above, you may be removing 50-80% of the entire leaf mass simply because you’re dealing with such a tiny plant. That would slow your plant growth tremendously and our goal is to promote steady, rapid growth. So instead of totally removing these lower branches on a young plant, you’re going to make them into a solar collector. To do this, simply look along the branch and pop off EVERY SINGLE side branch, and branch bud, including the very tip, but keep all the leaves. Everything that could grow a new branch or a new leaf should be removed. This preserves a lot of very valuable leaves and allows them to keep producing food for the young plant, but that branch no longer has any possibility of growing more branches or leaves. As the rest of the plant gets bigger and bigger, removing these lower branches will eventually become pretty insignificant and you can prune them off.
Second Pruning - 2 weeks later
Your plant should be large enough now that removal of the “Solar Panels” you created in the previous pruning session will not significantly hinder plant growth. At this stage, you will have a group of tops in the center and some side branches around the outside that are almost always lower in height. Start by removing all the apical buds on the highest tops. Again, this slows growth in the top center of the plant and allows the outside branches to catch up. You have two goals in this pruning session;
- Create more tops - because each top becomes a bud.
- Slow the growth in the center and allow the outer branches to catch up by growing out around the sides.
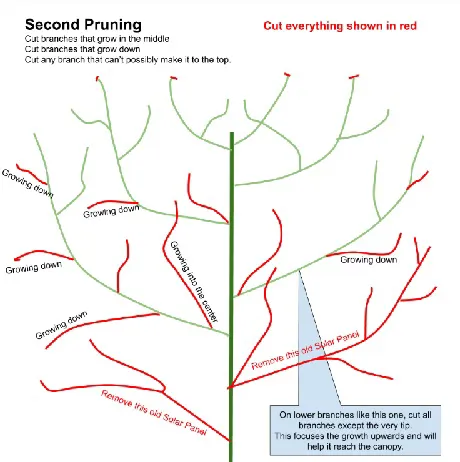
On the outside branches, remove any side branches, especially if they grow downwards. Focus the energy into the growing tips with the goal of getting that tip to reach the canopy before the lights flip. If it is clear that a side branch is too low and not ever going to catch up with the others in the top canopy - now is the time to cut it off. Be objective in this decision and know that your problems will soon be with overcrowding in the canopy, so you don’t need every single lower branch. Trim off branches that are inside the middle of the plant that are not making it up to the canopy - however, read below about the scrog method and recognize that if you are going to employ this technique, some branches that are in the center of the plant now, will reach the canopy once the screen is lowered. With this in mind, you may want to leave those branches that are in the center of the plant until after you lower the screen.
Third Pruning
This usually takes place 2 weeks after the 2nd pruning - and just before transplant to the flower room. By now most of your tops should be reasonably close to the upper canopy and your young plant is almost ready to be moved to the flower room. One last time, pop off the top bud of any branches that are higher than the rest and prune off any lower branches that are obviously not ever making it to the canopy. Again, prune small branches that are below the canopy and growing towards the center of the plant. You want the inner part of the plant below the canopy, to be somewhat open so air can flow through. If you see a congested place where the leaves are growing in a thick mass, now is a good time to snip off a couple big leaves and open it up. I don’t suggest going crazy lopping off all the big leaves. only take off leaves that are causing a congested area where there might be an airflow problem.
Older leaves are a storage container for plant nutrition
Sap testing and defoliation studies show us very clearly that the older leaves contain many nutrients that the plant will actually pull out later in the season when those nutrients are needed for flower/fruit formation. In times when nutrients are insufficient, the plant will move stored nutrients up from the lower leaves to the new growth or fruit. When nutrients are overly abundant, the plant will move nutrients down to the lower leaves for storage. With that in mind, it is always preferable to keep as many leaves as possible. When the plant needs that nutrition, it will withdraw everything from a leaf and that leaf will turn brown and shrivel up. At that point, it should be removed to keep the plant clean. If you’ve heard that older leaves create mold problem. Ask yourself, when was the last time you actually saw mold growing on a dead leaf? Never! Mold requires moisture to grow and dead leaves don’t have that. However, if a leaf was covered in mold before it died, it should definitely be removed because mold will throw spores everywhere if allowed to stay on a dying leaf - or on a living leaf.
Stay tuned for the third and last part on pruning cannabis for indoor farms!
For more information:
Glen Johnson
[email protected]
LinkedIn